There’s a special kind of freedom that comes with the first truly warm day of summer—the day you finally push your boots to the back of the closet and gleefully pull out your favorite sandals. It’s a signal that carefree, sun-drenched days are here. But it’s often followed by a universal, slightly panicked thought as we look down: “Oh. My feet.”
After months of being hidden away in socks and shoes, our feet can often look a little neglected. Dry skin, rough heels, and less-than-perfect polish might not feel quite ready for their summer debut. While a trip to the salon is a wonderful treat, mastering the art of the at-home pedicure is a game-changing act of self-care. It’s your secret weapon for having beautiful, sandal ready feet all season long, saving you time and money while giving you a wonderfully relaxing ritual to enjoy.
Forget a quick slap of polish. We’re talking about the full, luxurious, salon-worthy experience. This is your ultimate guide to transforming your feet from winter-worn to summer-stunning. Let’s get started.
It’s Time to Let Your Feet See the Sunshine! Why a Great Pedicure is the Ultimate Summer Self-Care
Think of this process not as a chore, but as a ritual. It’s a dedicated moment to thank your hardworking feet for carrying you everywhere you need to go. It’s a chance to slow down, create a mini spa in your own home, and emerge feeling polished, put-together, and ready to step into the summer with absolute confidence.
Part 1: Gather Your Toolkit – Everything You Need for a Salon-Worthy Pedicure
The secret to a seamless and professional-feeling pedicure is having all your tools ready before you begin. It turns the process from chaotic to calming. Here’s your checklist:
- A basin or tub large enough for both feet
- Epsom salts or a lovely scented foot soak
- Nail polish remover (acetone or non-acetone) and cotton pads
- Nail clippers
- A nail file and a gentle nail buffer
- A cuticle pusher (wood or metal) and cuticle remover or oil
- A foot file or pumice stone for callus removal
- A foot scrub (store-bought or a simple DIY sugar scrub)
- A rich foot cream or a thick body moisturizer
- Toe separators (a lifesaver for preventing smudges!)
- Your nail polish trio: a quality base coat, your chosen color, and a high-shine top coat
Part 2: Your Step-by-Step Ritual for Perfect Pedicured Feet
Set aside about an hour of uninterrupted time. Put on your favorite podcast or playlist, pour yourself a refreshing drink, and let’s begin your transformation.
Step 1: Start with a Clean Slate (Remove Old Polish)
You can’t create a masterpiece on a messy canvas. Begin by thoroughly removing any old nail polish.
- How to do it: Saturate a cotton pad with nail polish remover and hold it on each toenail for about 10 seconds before swiping. This helps to dissolve the polish and makes removal much easier, requiring less harsh rubbing. Get into the edges and cuticles to ensure no residue is left behind.
Step 2: The Soothing Soak (Soften Everything Up)
This is where the spa-like relaxation truly begins.
- How to do it: Fill your basin with warm (not hot) water. Add a generous scoop of Epsom salts or your favorite foot soak. Epsom salts are fantastic for easing tired, achy feet. Immerse your feet and let them soak for at least 10-15 minutes. Read a book, close your eyes, and just enjoy this moment.
- Why it’s important: This step is crucial. It not only feels amazing, but it softens your skin, nails, and cuticles, making the next steps of your DIY pedicure much easier and more effective.
Step 3: Gently Smooth Away Rough Skin & Calluses
Now that your skin is softened from the soak, it’s the perfect time to tackle any rough patches or calluses.
- How to do it: Using a foot file or a pumice stone on your still-damp skin, gently scrub the areas that are prone to roughness, like your heels, the balls of your feet, and the sides of your big toes. Use firm but gentle pressure.
- Expert Tip: Be gentle! The goal is to remove dead skin, not raw, healthy skin. It’s better to do this lightly and regularly than to be too aggressive and cause soreness or irritation.
Step 4: Shape & File Your Nails Like a Pro
Properly shaped nails are the foundation of a polished look.
- How to do it: Use a clean, sharp nail clipper to trim your nails. The most important tip from professionals is to cut your toenails straight across. Avoid cutting down into the corners, as this can lead to painful ingrown toenails. After clipping, use a nail file to gently smooth any sharp edges, always filing in one direction rather than sawing back and forth, which can weaken the nail.
Step 5: Master a Gentle & Safe Cuticle Care
Healthy cuticles are key, but they need to be treated with care.
- How to do it: Apply a drop of cuticle oil or cuticle remover to the base of each toenail and let it sit for a minute. Then, using a wooden or metal cuticle pusher, gently push the softened cuticle back away from the nail plate.
- Crucial Safety Tip: It’s highly recommended that you do not cut your own cuticles at home. The cuticle is a natural barrier that protects your nail bed from bacteria and infection. Cutting it can open the door to problems. Pushing them back gently is all you need for a clean, tidy look.
Step 6: Exfoliate and Deeply Moisturize
This step will leave your feet feeling unbelievably soft and smooth.
- How to do it: Take a small amount of your foot scrub and massage it all over your feet and ankles, focusing on any remaining rough spots. This polishes the skin. Rinse your feet thoroughly and pat them completely dry with a soft towel.
- The Final Hydration: Now, apply a generous amount of a rich foot cream or body butter. Really take your time to massage it in. This not only feels heavenly but also boosts circulation and deeply hydrates your newly exfoliated skin.
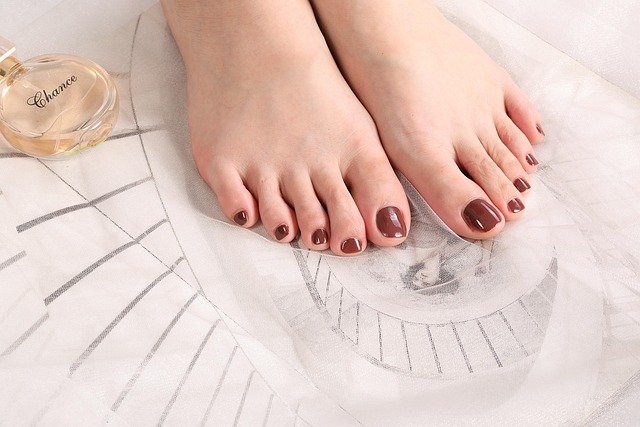
Step 7: The Flawless Polish Application (Base, Color, and Top Coat)
Now for the glamorous finale! A perfect polish application is all about a simple, methodical process.
- Prep the Nail: Take a cotton pad with a little nail polish remover and quickly swipe it over each toenail. This removes any lotion residue that could prevent the polish from adhering properly.
- Use Toe Separators: Pop these in now. They might feel a little silly, but they are the secret to a smudge-free application.
- Apply a Base Coat: Don’t skip this! A clear base coat does two important things: it protects your natural nail from being stained by the color pigment, and it gives the polish something to grip onto, making your pedicure last longer.
- Apply Two Thin Coats of Color: The key to a smooth, professional-looking finish is applying two thin coats of your chosen color, rather than one thick, gloopy one. A thin coat dries faster and is less likely to bubble. Let the first coat dry for a couple of minutes before applying the second.
- Finish with a Top Coat: A high-shine top coat is your armor. It protects your polish from chipping, adds a beautiful glossy finish, and can help your pedicure last for a week or more. Be sure to swipe the brush along the free edge (the tip) of your nail to seal it in.
Step 8: The Art of Patience: Letting Your Polish Dry Completely
You’ve done all this beautiful work – don’t ruin it in the last five minutes!
- How to do it: Give your polish at least 15-20 minutes of undisturbed drying time. Seriously. Don’t put on socks or shoes. Don’t rummage through your bag. Sit back, relax, watch an episode of your favorite show, and admire your handiwork.
Part 3: How to Keep Your Feet Sandal-Ready All Summer Long
A great pedicure can last a long time with a little bit of consistent care.
Your Simple Daily & Weekly Foot Care Maintenance Plan
- Daily: The number one tip is to apply a good foot cream or body lotion to your feet every single night before you go to bed. This simple habit keeps skin soft and prevents dryness and cracking.
- Weekly: Keep your foot file or pumice stone in the shower and give your heels and other rough spots a quick, light buff a couple of times a week. This takes less than a minute and makes a huge difference in maintaining smoothness.
- Every Few Days: You can apply a fresh layer of your top coat every 2-3 days to restore shine and further protect your polish from chipping.
The Often-Forgotten Tip: Sunscreen on Your Feet!
We are often so diligent about applying sunscreen to our face and body, but we completely forget our feet! The tops of our feet are highly susceptible to sunburn, which is not only painful but also damaging. Make it a habit to apply sunscreen to your feet every time you wear sandals.
Soothing Cracked Heels Overnight
If you’re dealing with very dry or cracked heels, try this intensive overnight treatment:
- Before bed, apply a very thick layer of a heavy-duty balm (like Vaseline, Aquaphor, or a specialized heel balm) to your heels.
- Then, put on a pair of comfortable cotton socks and go to sleep.
- The socks will help the balm penetrate deeply overnight. You’ll wake up to noticeably softer feet.
Trending Hues: Fun & Flattering Nail Polish Colors for Summer 2025
Looking for some color inspiration? Summer 2025 is all about fun and vibrant shades!
- Vibrant Corals & Peaches: The perfect warm, sunny shades.
- Oceanic Blues: From soft pastel baby blues to deep navy.
- Crisp, Clean White: A chic and modern choice that makes any tan pop.
- Classic Fiery Reds: Always in style, always glamorous.
- Playful Pastels: Think soft lavender, mint green, and buttery yellow.
Step Out in Confidence This Summer!
Taking an hour to give yourself a proper, luxurious at-home pedicure is more than just a beauty task; it’s a powerful act of self-care. It’s a way of grounding yourself, showing your body gratitude, and preparing yourself to step into the world—or just into your favorite pair of sandals—with an extra boost of confidence.
With this guide, you have all the tools and knowledge you need to achieve and maintain beautiful, healthy, sandal-ready feet all summer long. So go ahead, schedule your next self-care session, and get ready to put your best foot forward.
We’d love to hear from you! What’s your go-to nail polish color for the summer? Or do you have a secret foot care tip that works wonders? Share your thoughts and favorites in the comments below!